Oh yes, Dungeon Pack creation. In this section we will show you how to make your first very own simple 15x15 Center door based Dungeon Pack as well as how to configure the basics of it in order to be able to start generating it.
1. Creation of the Dungeon Pack.
Execute command /dg editor and click the button Add new Pack
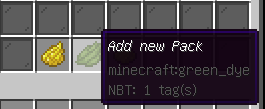
You will be prompted with a message asking you to input a name of the Dungeon Pack. This will be used as internal ID of the whole system, it must be 1 whole word and can be anything. let's just called it dungeon_1 .
Right after that you will be asked for the size of the Dungeon Pack. That would specify the size of the tiles used within the Dungeon pack, since we are going to make a 15x15 Dungeon we would want to input 15 in there.
Once you submit it the result of messages you should have it's something like that:

You have to wait for few seconds or minutes (depending on servers hardware). Once it is done it will automatically present you with the Dungeon Editor GUI.
This is the heart of the Dungeon Pack, it is where you make all the changes and edit and configurate your Dungeon pack.
Once you are inside of it. Simply click on the Ender pearl to teleport to your Pack Matrix.
This is the view you should be presented with visualizing the whole Pack Matrix in Concrete Blocks.
Red Concrete means the tile have been registered and used by the dungeon pack (By default upon creation only Lobby is registered)
Green concrete means those are free slots that can be used to register new tiles.
2. Creation of Lobby and determining the doors locations
Creating the tile starts 1 block north from the concrete and extends in our case 14 more blocks North and 14 more blocks East forming a 15x15 Platform once filled up
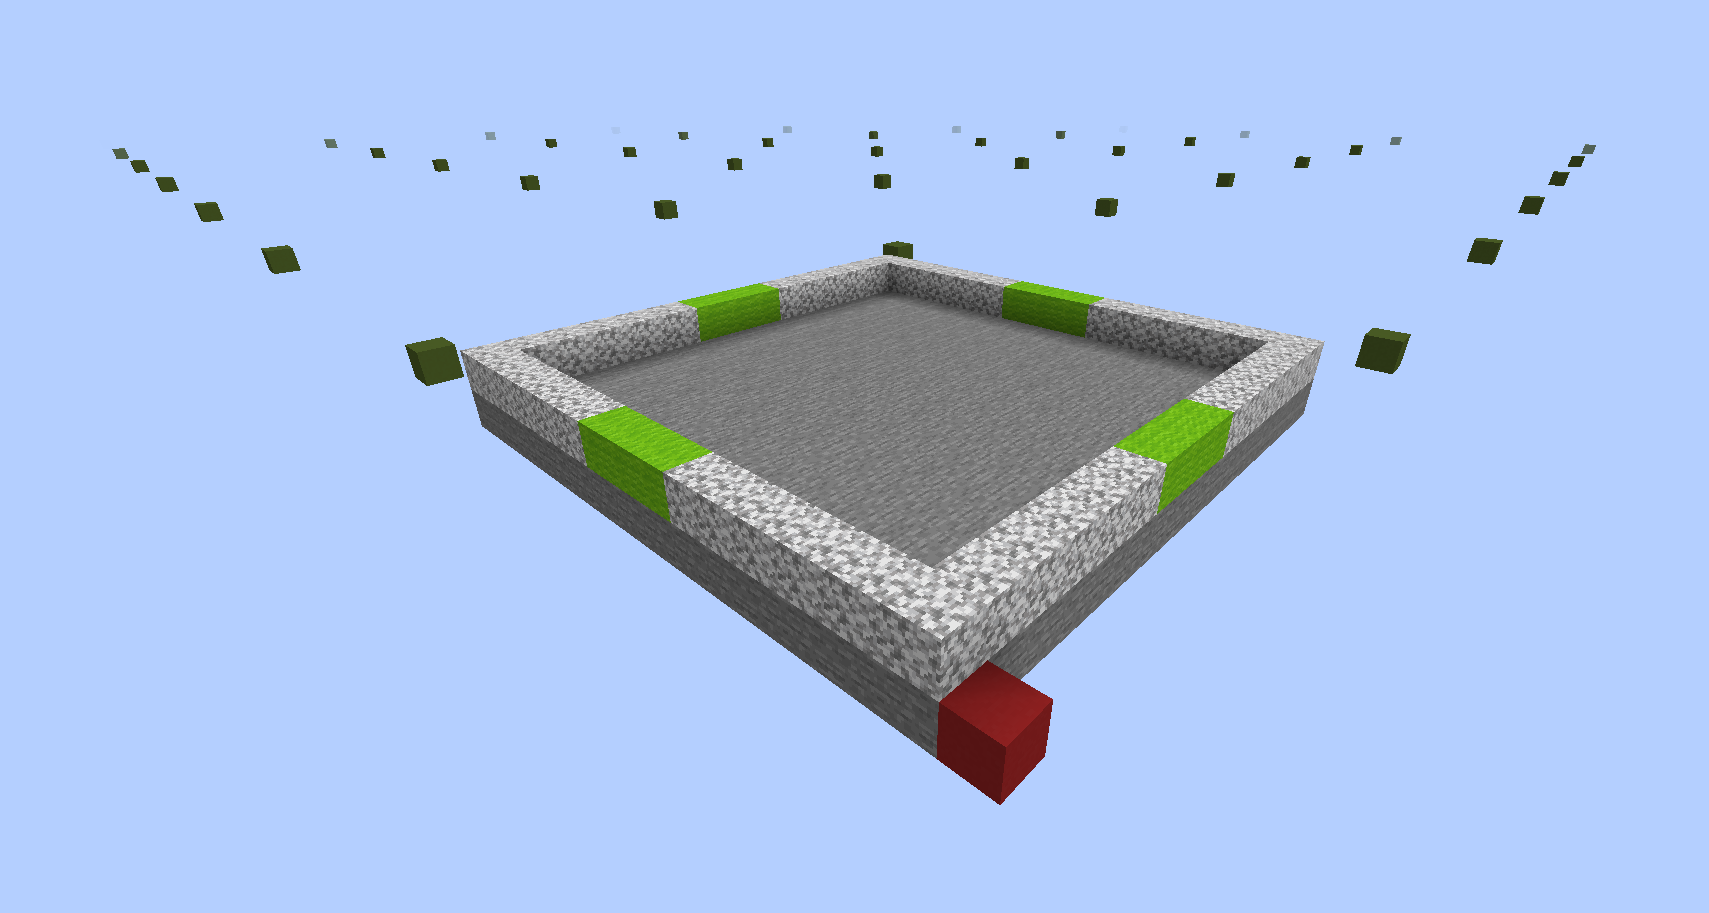
After having the basic 15x15 platform, we made a simple walls from Diorite that would indicate the walls of the tile as well as marked the center of each Direction with a 3 lime blocks. This is where our 3x3 Doors will be located.
3. Configuring the Door Locations
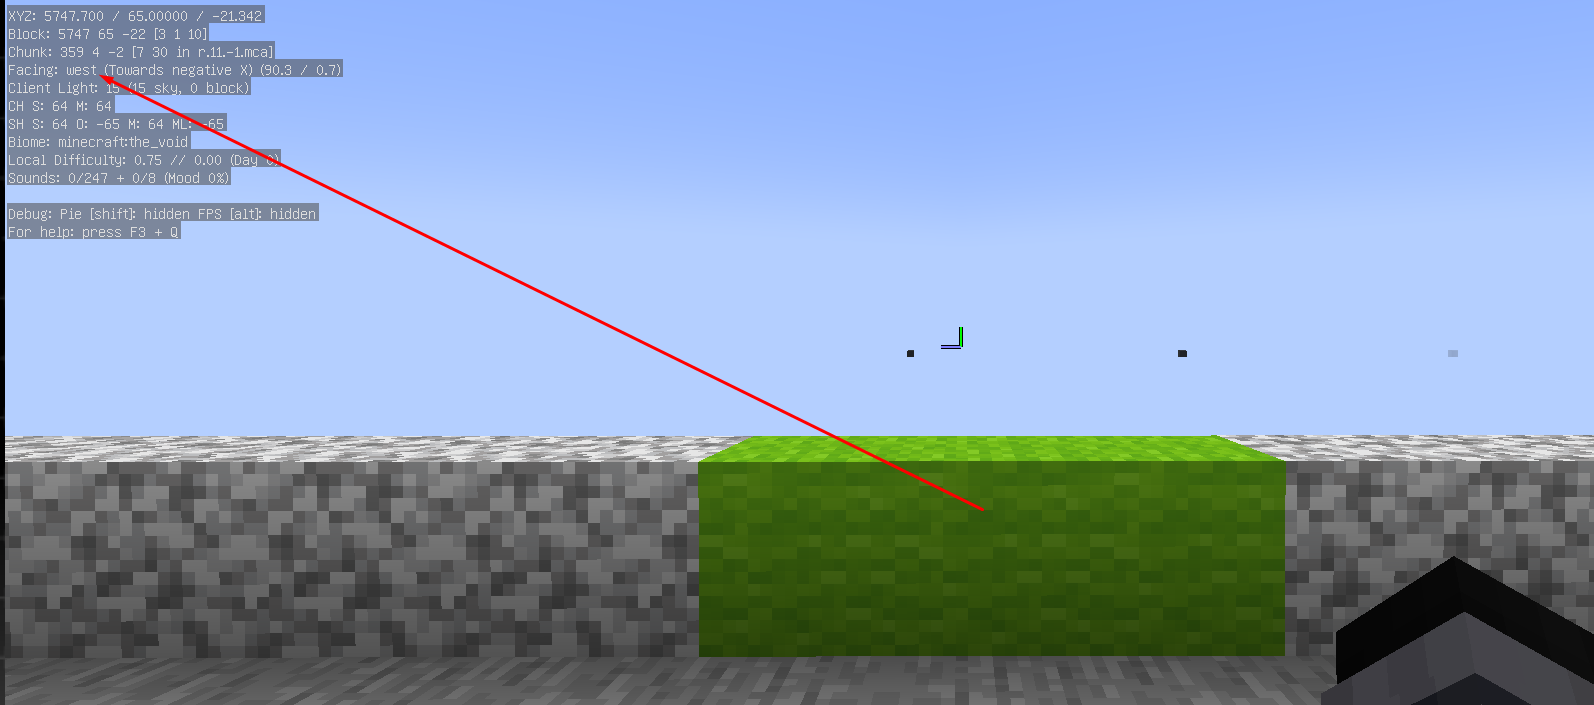
First we need to determine in which Direction the door is located. Once we stand in front of the door we can toggle F3 menu and see that the door we are looking at is “West” supposedly “West Center” door.
In order to configure the Door we need to estimate it's Offset. Placing a temporary block on the low left end of the door would help you estimate the offset quicker.
Like this:
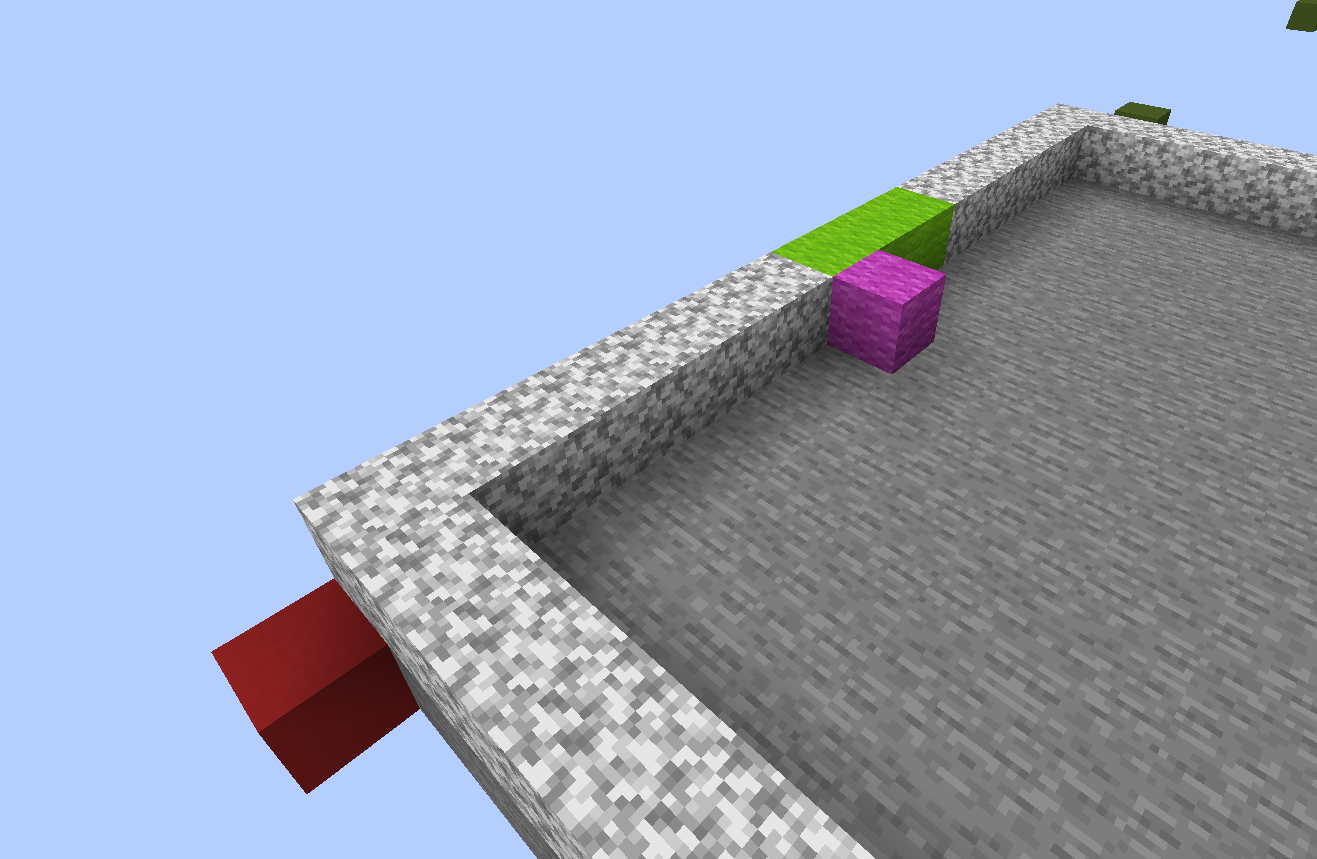
Now we need to estimate the Offset from the first NORTH block from the Red concrete to the Magenta. Making a trail of countable blocks to the magenta will help you speed out this process like this:
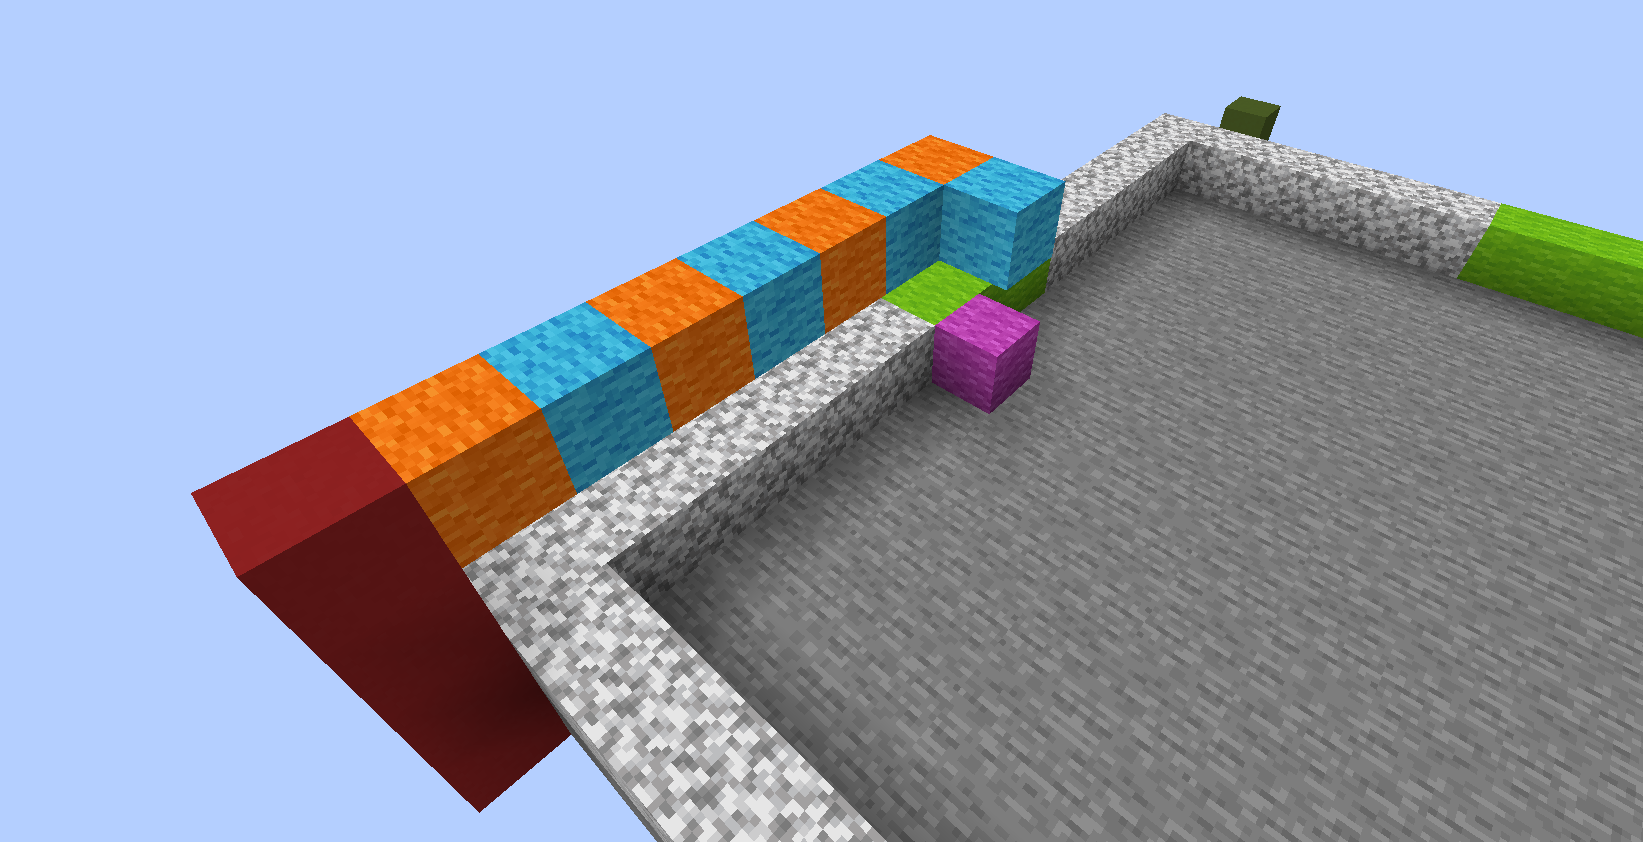
The Blocks extending NORTH form ALWAYS a negative value. In our case it is -7
The Blocks extending EAST form ALWAYS a positive value. In our case it is 1
In this example the West Center Door value is 1,-7
Repeating the same process 3 more times would give us that:
North Center is 6,-14
East Center is 13,-9
South Center is 8, -2
(For blocks going north you have to always take into account the first block)
(For blocks going east you shouldn't take the first block into account)
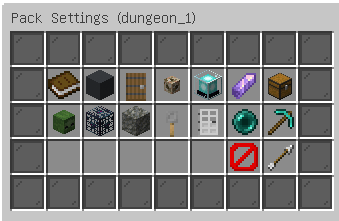
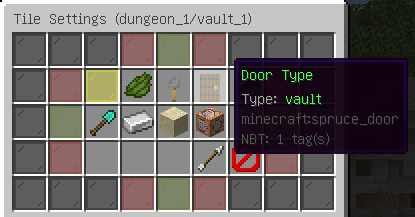
Once we have all the values collected we would want to execute /dg editor and move to our pack dungeon_1 then select Doors Menu then General door Settings at the bottom of that menu
Once you enter the Menu you will be presented with some buttons. The ones we are looking to set in our Dungeon pack are following:
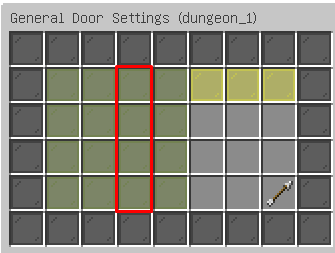
Respectfully NORTH WEST EAST SOUTH Center Doors. In each we would want to input the values we previously collected:
West Center 1,-7
North Center 6,-14
East Center 13,-9
South Center 8, -2
Great, so far so good. We made the doors structure and configured their locations but we are still missing some crucial parts.
4. Configuring Lobby tile as well as Enter and Exit locations of the Dungeon.
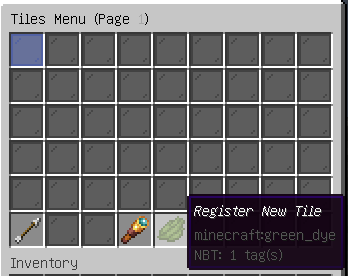
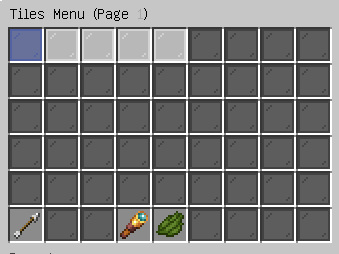
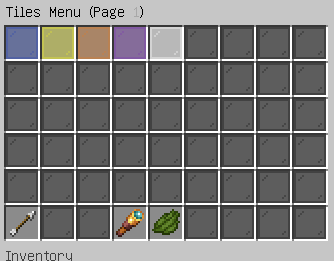
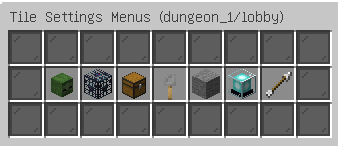
Starting of by navigating to /dg editor and then Tiles Menu you will be presented with the following GUI:
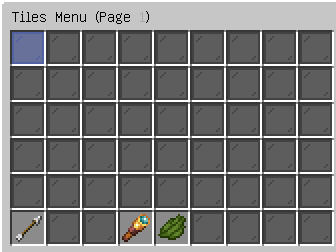
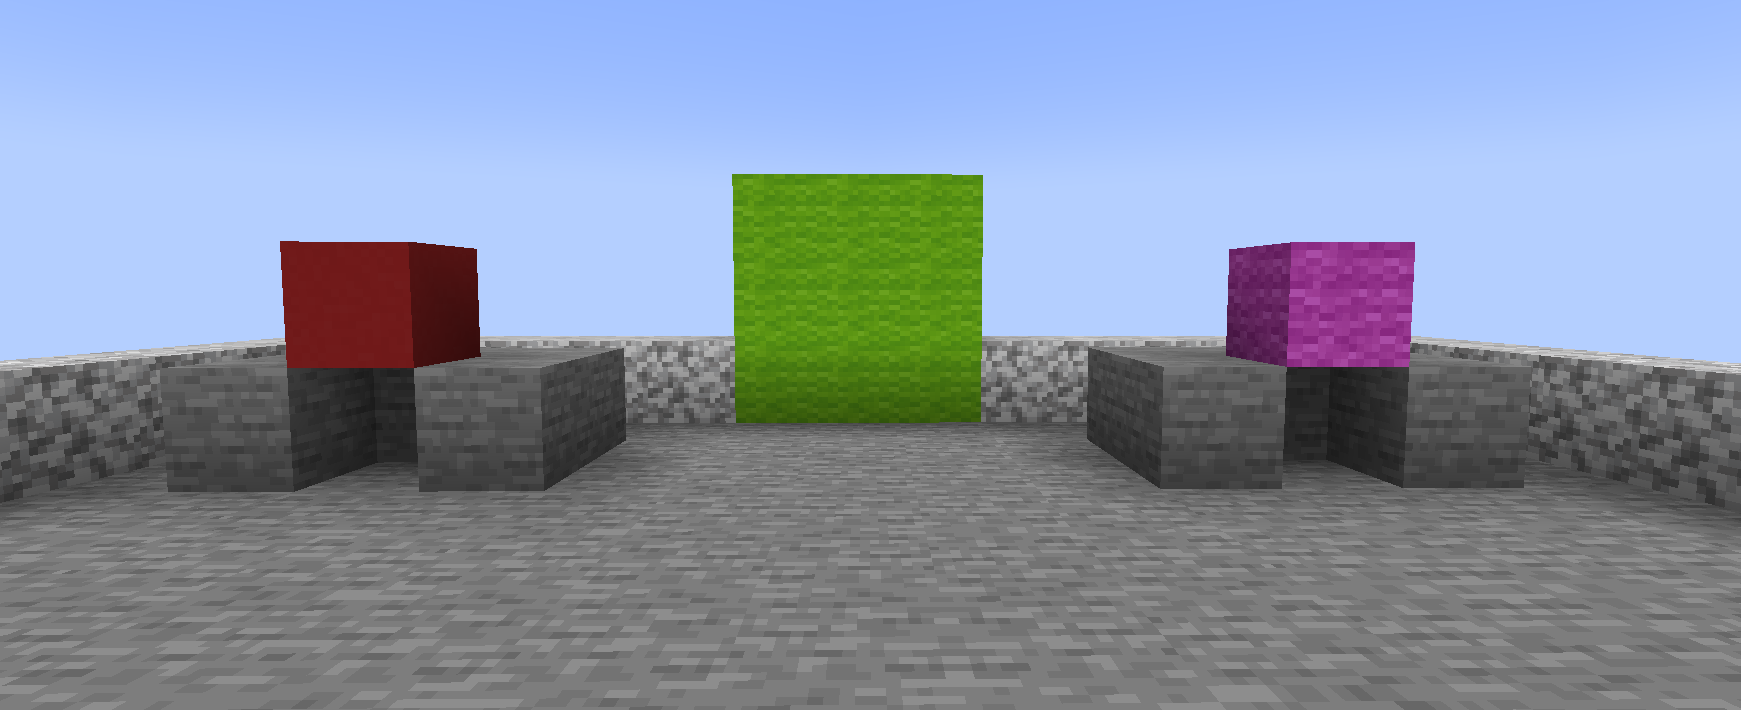
The tile types are indicated with colored glass:Blue - LobbyYellow - VaultPurple - BossOrange - EliteWhite - Normal
In order to generate a Dungeon we are required to have at least 1 of each type. But for now we are going to stick to Lobby configuration. Click on the blue glass and you will be presented with the following GUI:
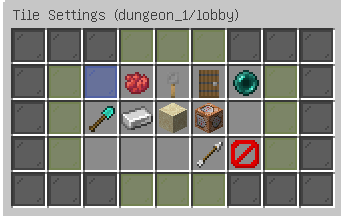
In order to disabled Left and Right doors we would want to toggle all the Green Glass that isn't centered
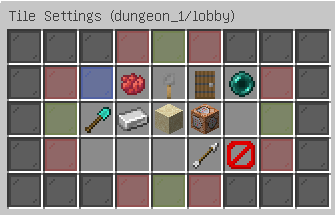
This should be your end result. Thereafter you would want to click on the SAND block in order to set a Time for the tile in seconds. Lobby is always generated first which allows people to set some preset startup time for the Dungeon. In our case we will set it to 1800 which will be 30 Minutes of timer time just for the Lobby being selected in the Dungeon.
Next we would like to set the Spawn and Exit Locations for the Dungeon. First we need to build up our locations within lobby as example we will make two small U shapes with temporary flying block on top like this:
Then we would want to navigate to /dg editor then select dungeon_1 then General Settings Menu then you will want to first click on Dungeon Spawn
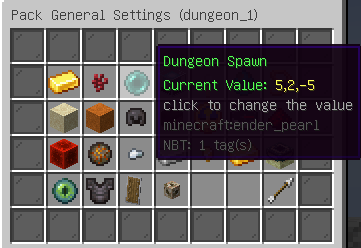
Click on it would close the GUI and ask you to right click a block. Simply right click the Red block thereafter the GUI would show up again. Right from this button you would see Dungeon Exit repeat the same process but this time click on the Magenta block.
Once you are done you can simply remove the 2 color blocks leaving the U shapes intact.
You would also need to set the GOLD_INGOT which is Vault Room chance to a number different than 0 (The bigger the number the more rarer it is)
(This is the odds how rare a extra vault should be generated beside the 2 Guaranteed one at the start and end of the dungeon)
Also the NETHER_WART which is Elite Room chance which effectively affect the same thing but for Elite Rooms (There are no guaranteed Elite rooms in generation, they are all luck based)
5. Creation of other tiles
As mentioned earlier we need to create at least 1 type of Tile so let's do that.
Navigating to /dg editor then dungeon_1 then Tiles Menu at the bottom you will see a button called Register new Tile
Once you click it you will be asked to input a name of it. recommended is if you are going to do a huge number of tiles to somehow mark them of by ID like normal1 normal_2 etc..
For our first example we will call them:vault_1boss_1elite_1normal_1
After inputting the first name of our Tile vault_1 we will be asked to right click a Green concrete block to register the tile.
We want to repeat the same process for each of the tiles and in our example we will register the tiles like that:
Once we do that our 4 Green Concrete will turn into red ones.
All tiles are registered as normal by default this is why we want to change that.
Navigating to Tile Settings menu from Editor → Tiles Menu → tile_id we want to click on the Type type button until it changes to the type we respectfully aiming for.
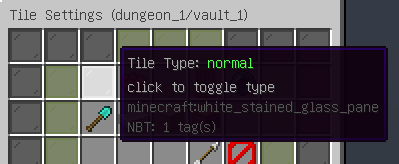
This is how your Tiles Menu would have looked like before you set that:
And this is how it should look like after you set it:
Once you configure this. respectfully for each tile we want to toggle of the Left and Right Doors for EVERY tile as well as set Time per Tile for each.
If you have done all correct within Main Pack Settings menu on the book you should see the following result:North 0-5-0West 0-5-0South 0-5-0East 0-5-0
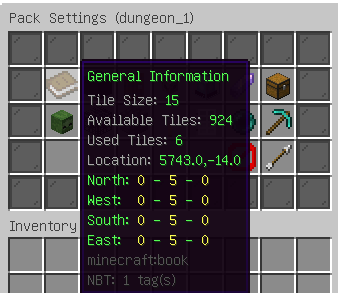
Indicating that out of the 5 tiles we have created we are using only the Center doors and Left and Right doors are completely unused.
(For those that will get confused why it says “Used Tiled: 6” It is because Dungeon as well automatically register 1 tile internally beside Lobby that isn't available for edits).
After that we would want to build the tiles like we did with Lobby. In our example we will transfer the lobby to a blue tile, boss to purple, vault to yellow, elite to orange and normal to white.
While keeping the stone U shape structure we created earlier as this is where our players will spawn at and will leave the Dungeon from.
6. Creation of Doors
We want to navigate to the end of our Matrix towards EAST where at the end we will find a Gray concrete blocks instead of Green.
This is where our doors Matrix is located.
In here similar to the Tiles creation we want to create a few Doors.
Navigating to Editor → Doors Menu → Register new Door we would want to create 4 Doors:normal_doorboss_doorvault_doorelite_door
Right clicking each of the doors would turn the Gray to Brown Blocks indicating that they are registered.
Then we would want to build a simple 3x3 doors with out respectful designs for each.
We choose to make Normal from Stone
Boss from Deepslate
Vault from Gold Blocks
Elite from Oak Planks
as well in each doors center we placed a Dispenser which would be used for location where keys will be inserted to open the doors.
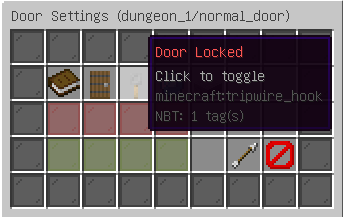
Once we have this done we would want to go back to Editor → Doors Menu → select_door
We will start of by selecting normal_door
Once we are in the GUI we want to toggle first the Lock State of the door which would be clicking this button
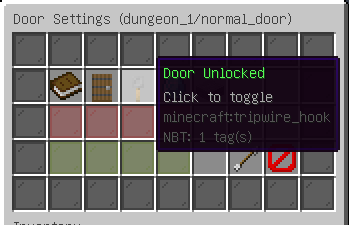
and result should look like
As well you would need to set the Type of each door respectfully:
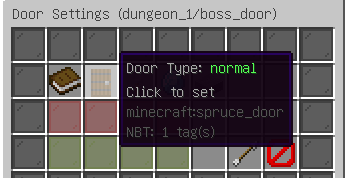
You need to click on that and input a boss for Boss type door elite for Elite type door vault for Vault type door.
Thereafter we want to set the Chance of the door. This would indicate how often this door will be selected across all doors from same type. Since AIR door is also a normal type door. We would want to set the Locked door to small value than Air, in order to make Locked doors appear little bit rarer than air doors (just open paths). We recommend setting this to 2 and leaving AIR door type default to 10
Since we toggled off state of the door to Locked we would want to set up the Offset cords as well as Animation cords for each of the doors respectfully normal, boss, vault, elite.
We wont be going in much detail about how this exactly works as this is quite complex and long process to understand therefor we will just provide you with the Offsets for a Dispenser located in the middle of a 3x3 door (as we previously build them) as well as animation offsets for 3x3 doors going down upon opening.
| North Offset | 1,1,-1 |
| South Offset | -1,1,1 |
| West Offset | -1,1,-1 |
| East Offset | 1,1,1 |
| North Animation | 0,0,-1,2,2,-1 |
| South Animation | -2,0,1,0,2,1 |
| West Animation | -1,0,-2,-1,2,0 |
| East Animation | 1,0,0,1,2,2 |
You would also need to link the Doors to the tiles.
Navigating to Editor → Tiles Menu → tile_id respectfully Vault, Boss and Elite tiles you would want to enable the connector for this Tile shown in the example below:
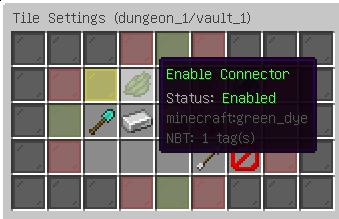
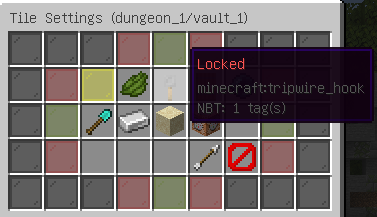
You would have to do this for each Boss, Elite and Vault tiles respectfully with their values.
For Lobby tiles you would simply have to leave Connector: Disabled
And for Normal tiles you would want to decide if you want certain Normal tiles to be always locked and guarantee locked status or still refer to simply normal doors and be sometimes locked sometimes unlocked (recommended)
7. Registering Keys, Mobs, Boss, Blocks, Loot, Waypoint
In order to be able to be able to generate a Dungeon properly without a errors and issues.
You would need to set up:
At least 5 Key Locations in Lobby tile and every Normal tile.
At least 1 Waypoint Location in every tile.
At least 1 Boss Mob Location within Boss tile.
At least 1 Elite Mob Location within Elite tile.
Loot, Blocks and Spawners are Optional.
Settings up Key and Waypoint Locations are among easiest things to do.
First you want to Teleport to Editor World and navigate to your Lobby tile.
Then you would need to grab a OAK_SIGN and place it and write the following thing:
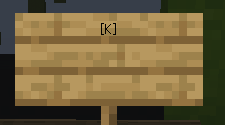
Then you would want to do that at least 5 times within Lobby tile.
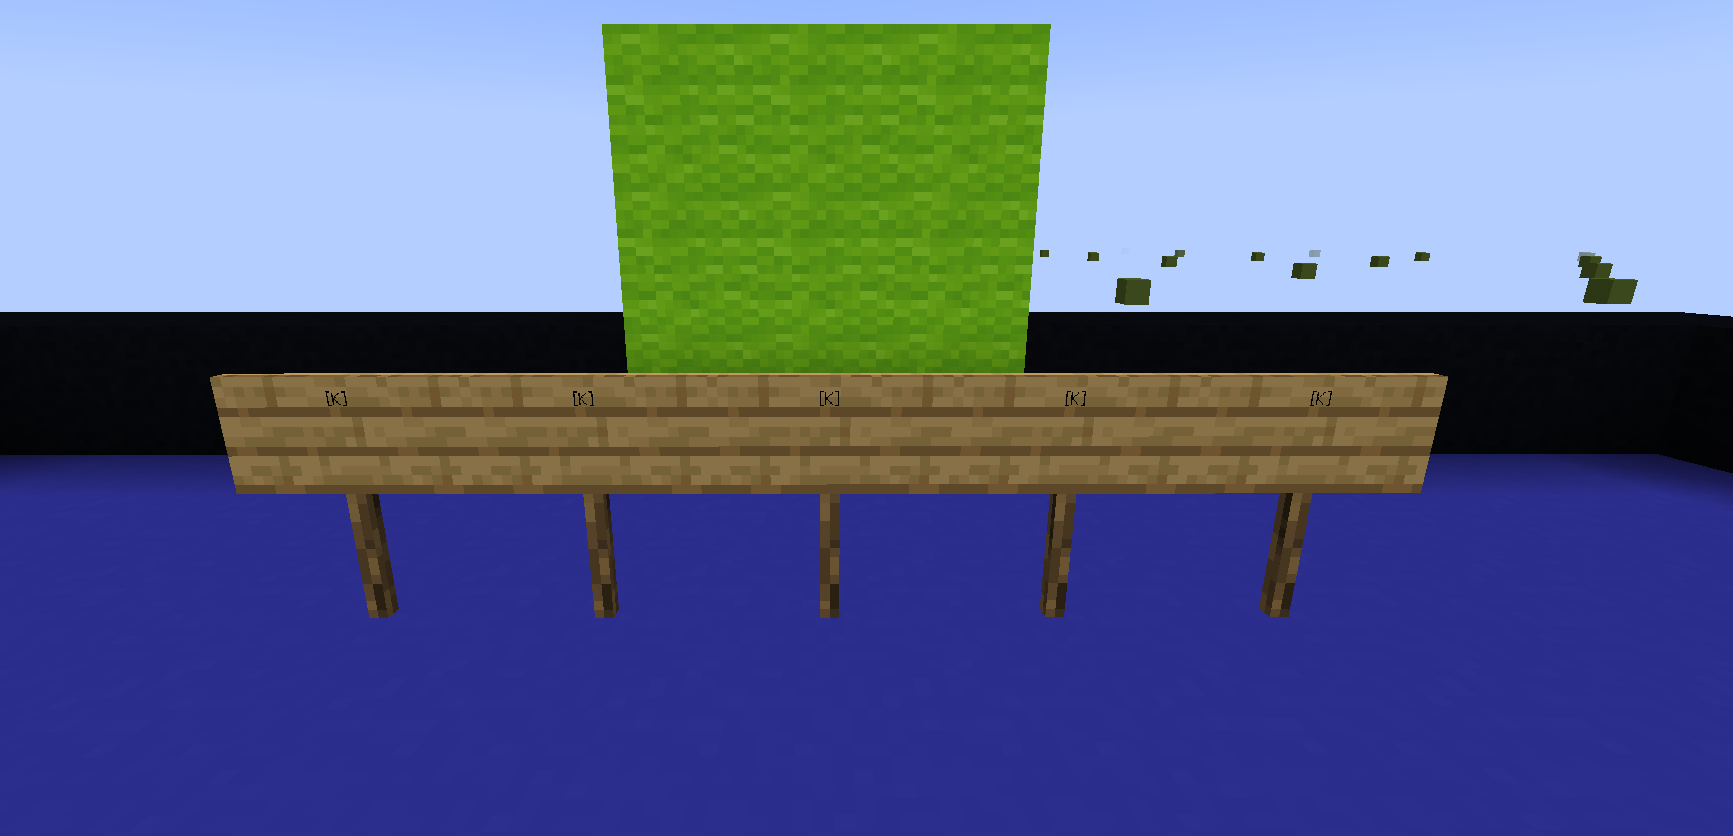
You would end up with result like that then all you need to do is register it to the tile.
Simply Navigate to Editor → Tiles Menu → lobby → Register Menus and you will be prompted with following GUI:
Respectfully Mobs, Spawners, Loot, Keys, Blocks, Waypoints
You are looking for the TRIPWIRE_HOOK which is the Keys Menu
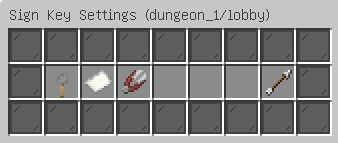
and simply click on the Paper which is Save Pool
All the signs would disappear and you would receive a message in chat You successfully saved the key pool for tile %name%
Then all you need to do is repeat that for every Normal tile in your List.
Next is setting up a Waypoints which follow the same structure as we did with Keys but instead of using [K] it uses [W] now and instead of using Keys Menu we are using the Waypoints Menu you simply have to set at least one Waypoint location per each tile in your list including Lobby, Boss, Elite, Vault, Normal tiles…
This is where things start to get interesting with setting up Pools.
Up next is settings up the Boss of our Dungeon or so called Pool of bosses (Dungeons allow you to make a pool of infinite amount of bosses that are randomly selected within each generation) for the sake of this Tutorial we are just going to do a simple VINDICATOR boss setup.
Navigate to Editor → Mobs Menu You will be prompted with the following GUI:
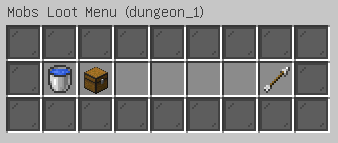
First you would want to navigate to Content Menu or the CHEST once click it, you will be prompted with a empty GUI at the bottom of it you will find 2 buttons:
1. Create new Mob Content
2. Create new Mythic Mob Content (Only available in case of Mythic Mobs is installed)
We will use the Create new Mob Content which would ask us to write a name of the Content. We will call this one boss_1
Once you submit the name you will be prompted with the following GUI:
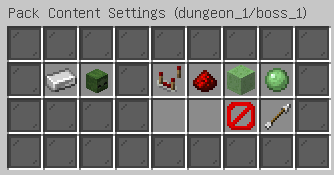
What you need to set up here is the ZOMBIE_HEAD or Vanilla Entity Type clicking on it would require you to type a valid EntityType. Since we are making Vindicator Content we will write VINDICATOR once we have it. We simply need to go back to Mobs Menu and transition ourselves into Pools Menu were we will again be presented with an Empty menu. We would want to Create a new Pool at the bottom of the GUI and name it with a easy to access ID like boss_pool then we will be prompted with a new GUI:
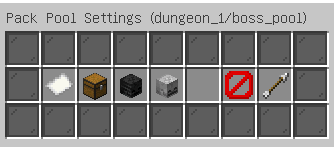
Effectively we will want to toggle on the WITHER_SKELETON_HEAD or Is Boss to Value: true since this is going to be our boss.
and then we want to navigate to the CHEST or Content Settings Menu this is where we finally get to link our Boss Content with our Pool.
Simply click at the bottom Add new entry to the Content and then add the boss_1 as entry to the list.
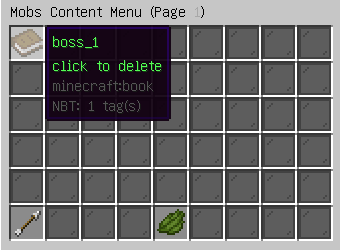
This should be the way your GUI looks after you are done. Then you can simply close the GUI and teleport yourself to the Boss Tile in Editor World.
You would want to grab your sign once again and write the following:
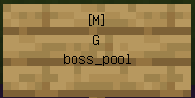
the [M] Indicates that this is a Mob. the G indicates Guarantee (You can also use C for Conditional which would require a number from 1-99 at the 4th line to make it Conditional and spawn sometimes, but for a Boss you need to set it to G because Boss is required to be present in order for Dungeon objective to be completed) and then the line 3 is simply the name of the pool you have earlier created boss_pool once you are done with placing the sign, you need to navigate to Editor → Tiles Menu → boss_1 → Register Menus → Mobs Menu → Save Pool and this would set up your Boss for the Dungeon.
For Elites you would need to repeat pretty much the same thing except instead toggling Is Boss within the Pool you have to toggle Is Elite .
For Elites you can make them Conditional so if a tile generates there is not a 100% chance a Elite will be there. It could be just the place with no Elite.
For Blocks (Usually Breakable blocks) you follow pretty much the same format and structure within their respective menus except the Sign Key is [B]
For Spawners the Sign Key is [S]
and for Loot the Sign Key is [L]
Once you have done all that. You can simply run command:/dg test dungeon_1 20 20
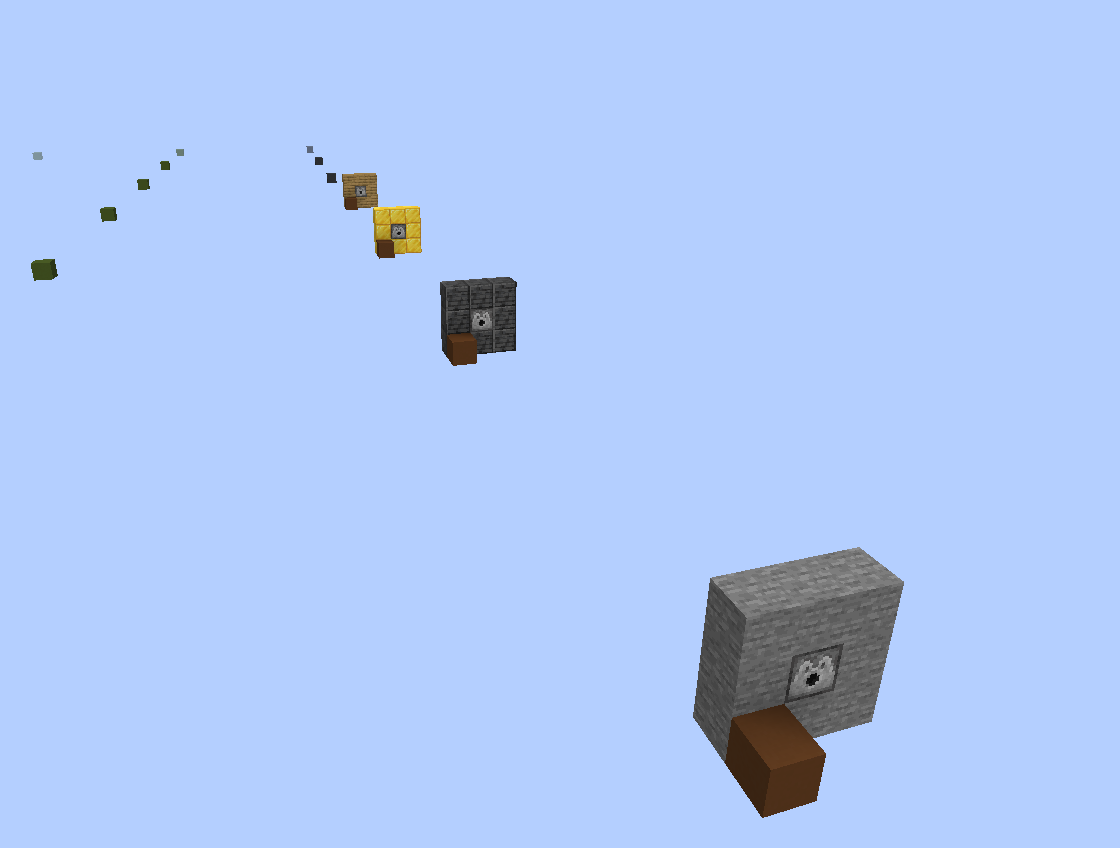
And if you have done all correct you should receive the following output:
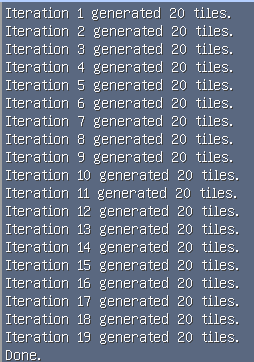
If you are getting something other than only 20 tiles are result. Then you did something wrong along the way which prevents generation from properly generating.
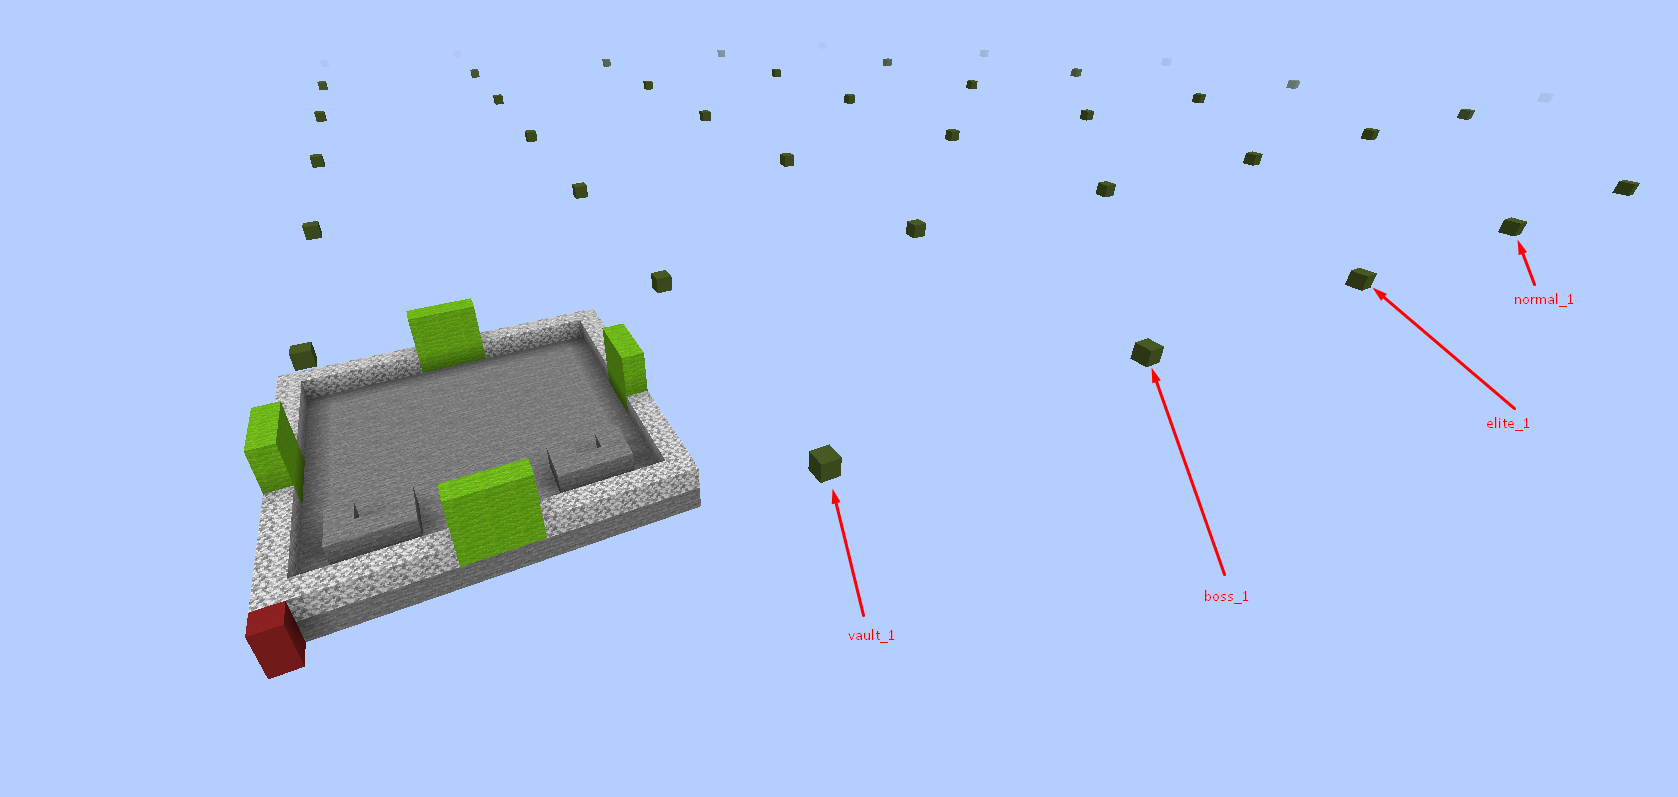
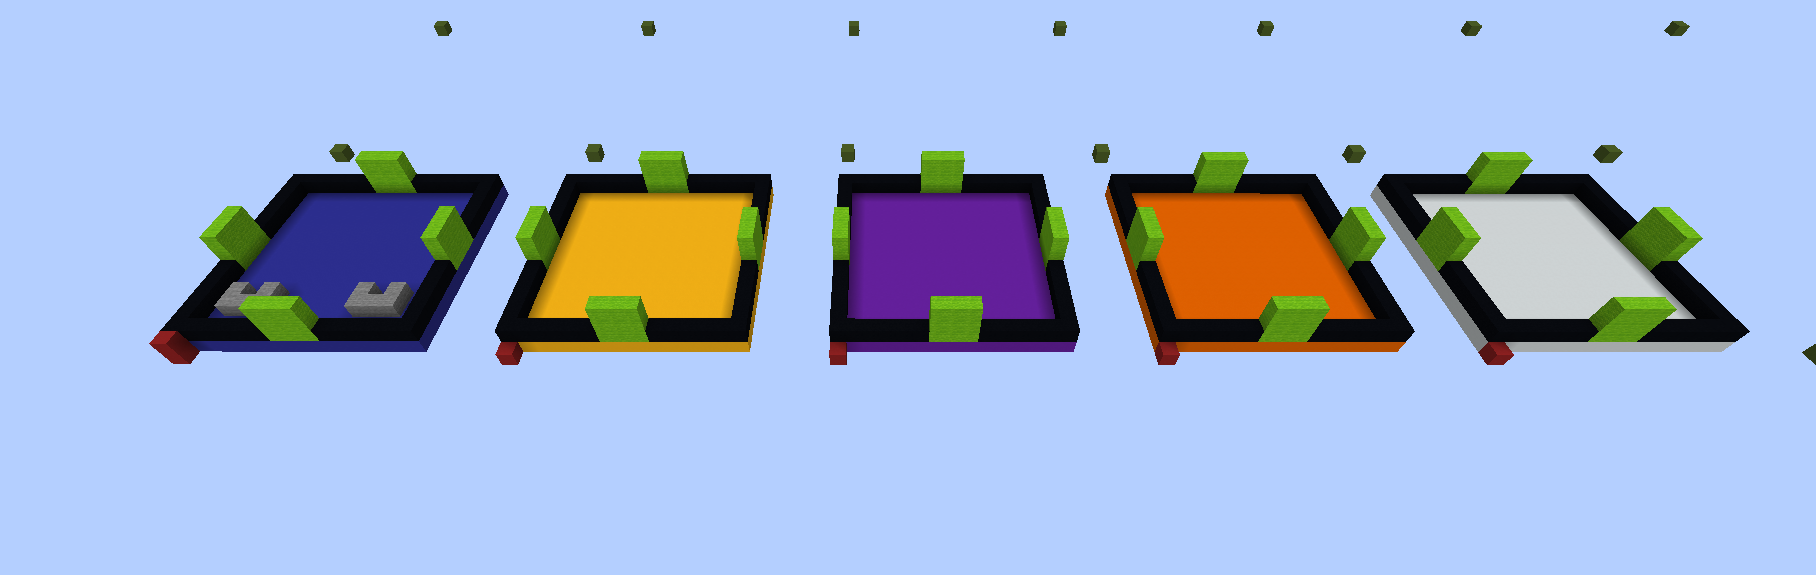
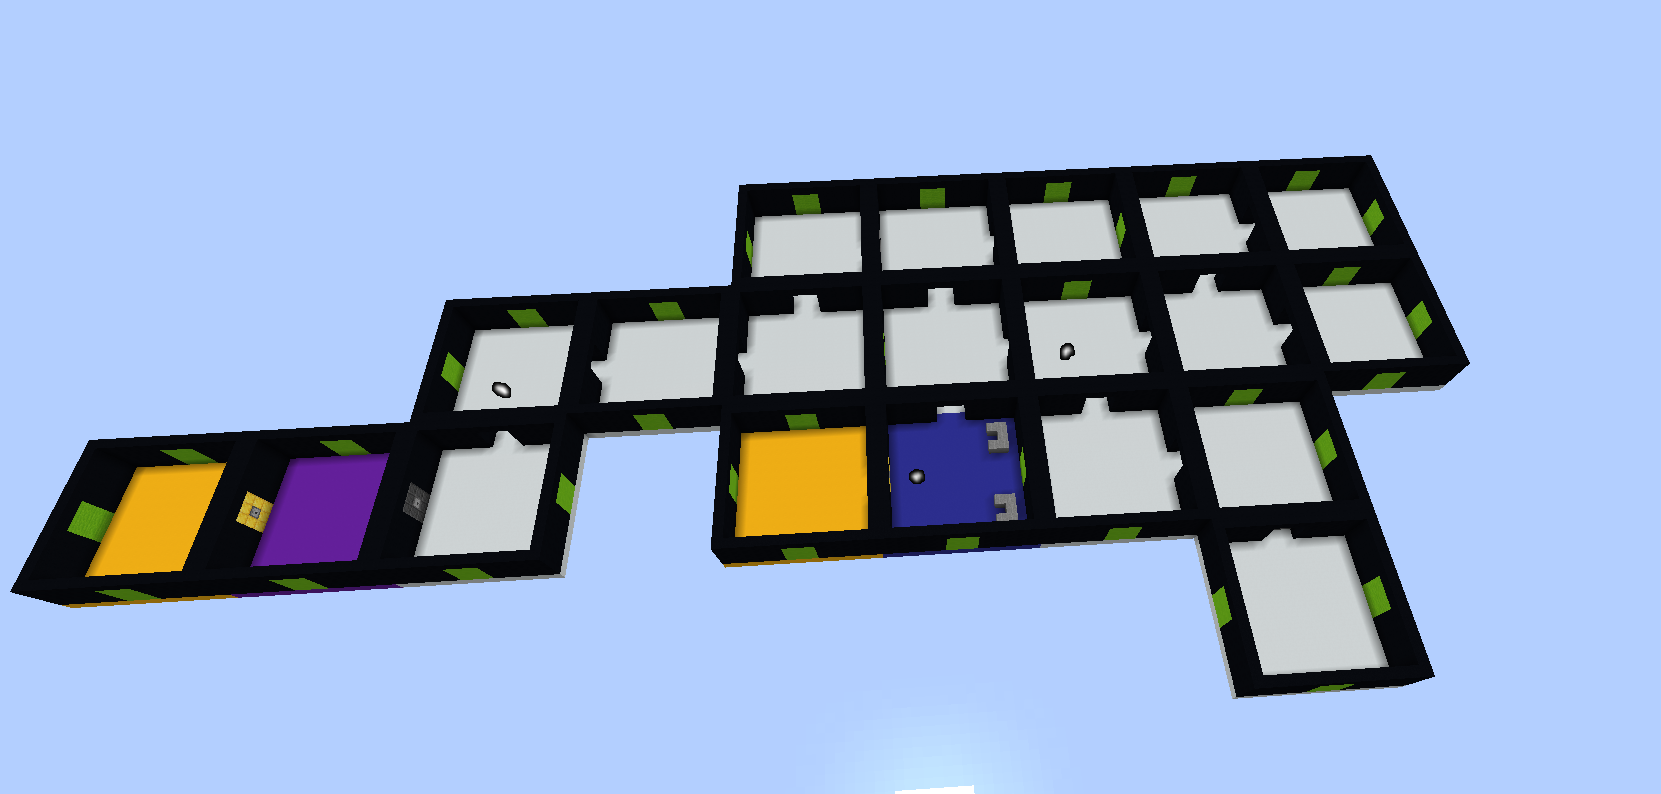
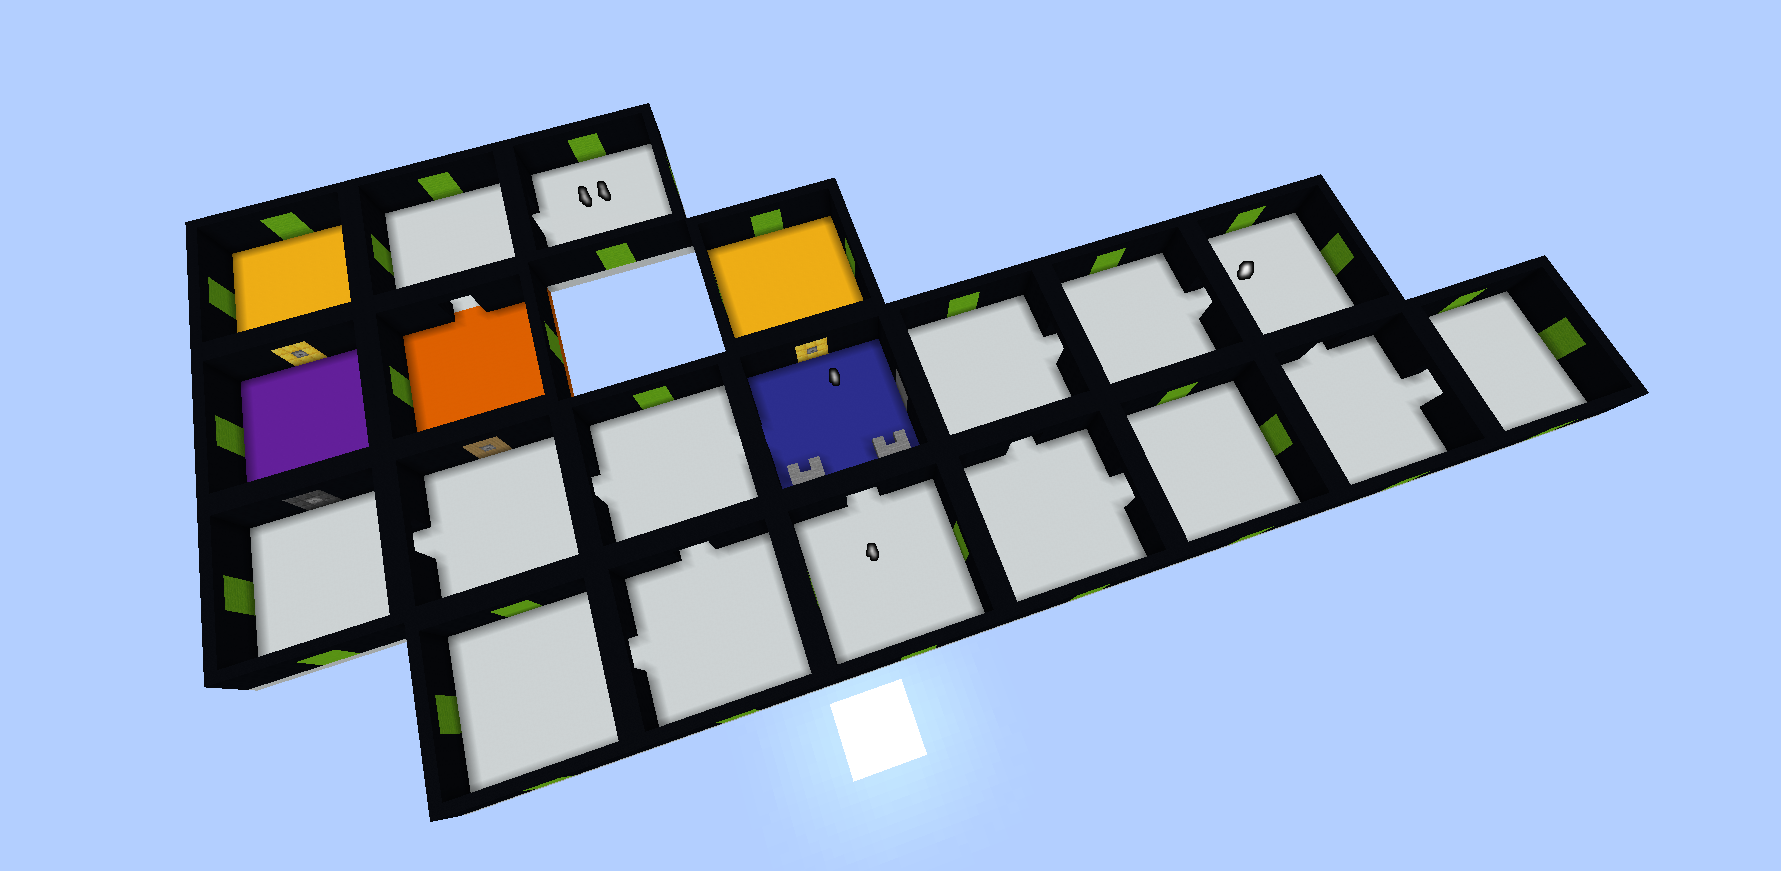
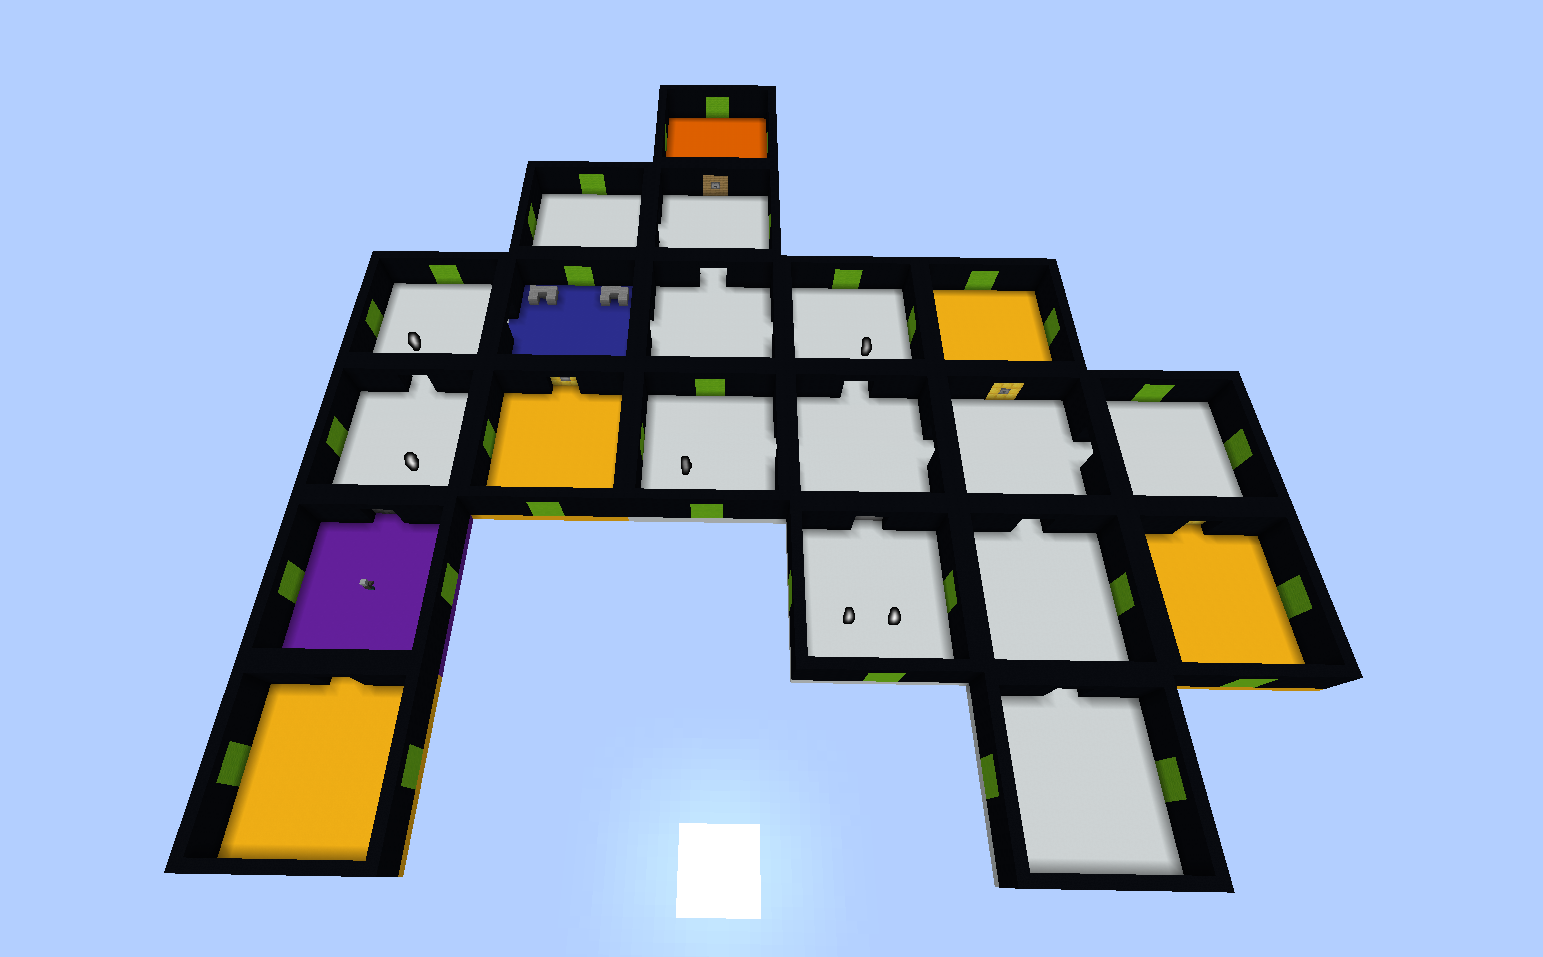
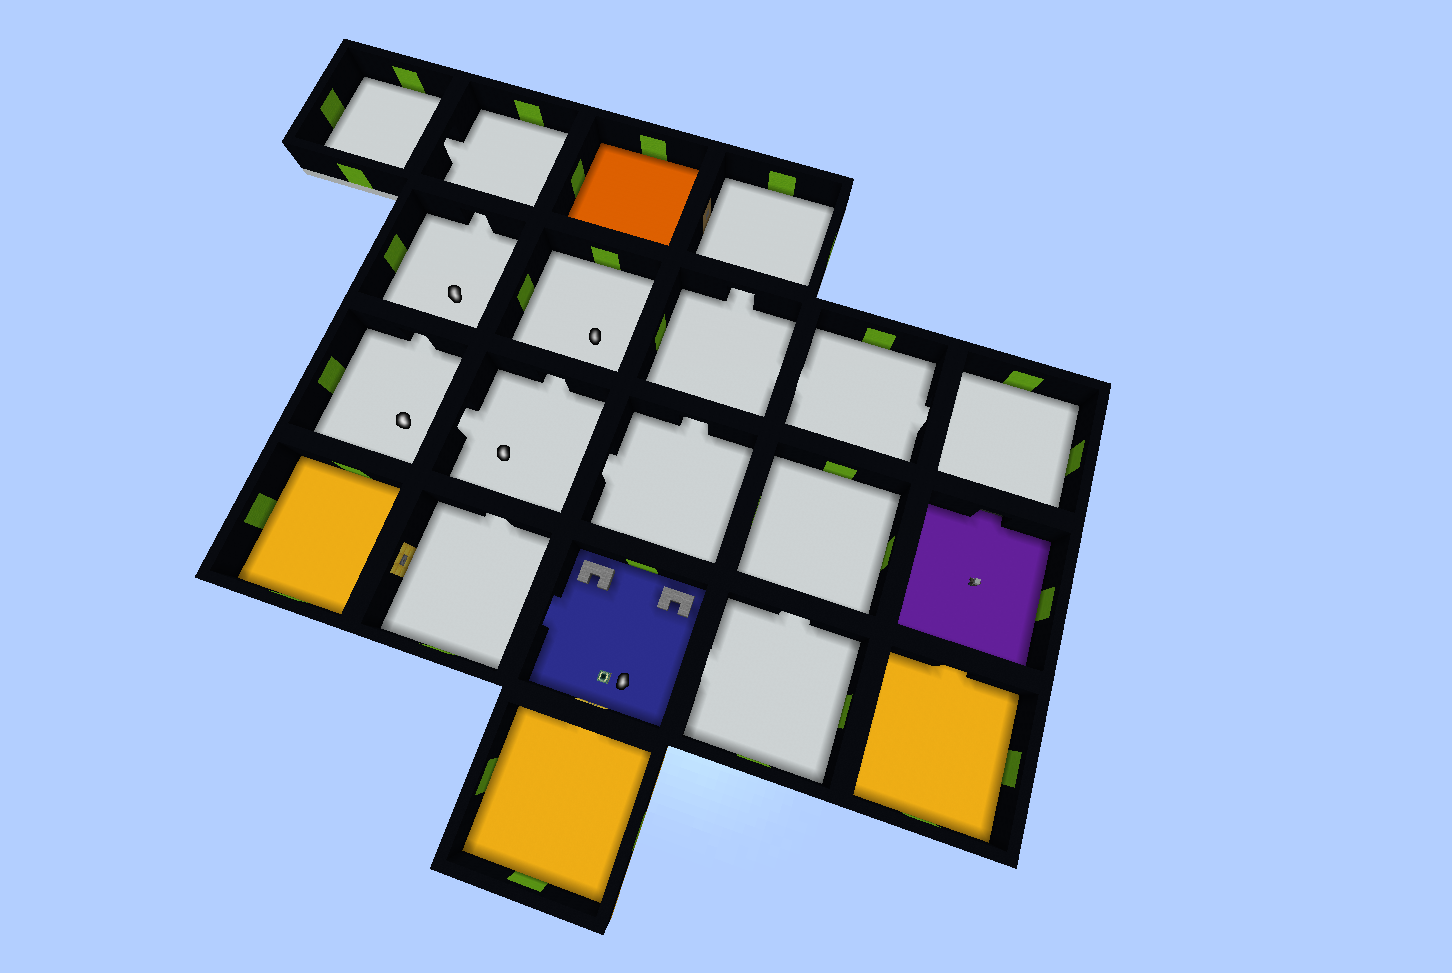
Here are some examples what you should be getting as final results from your journey with this tutorial:
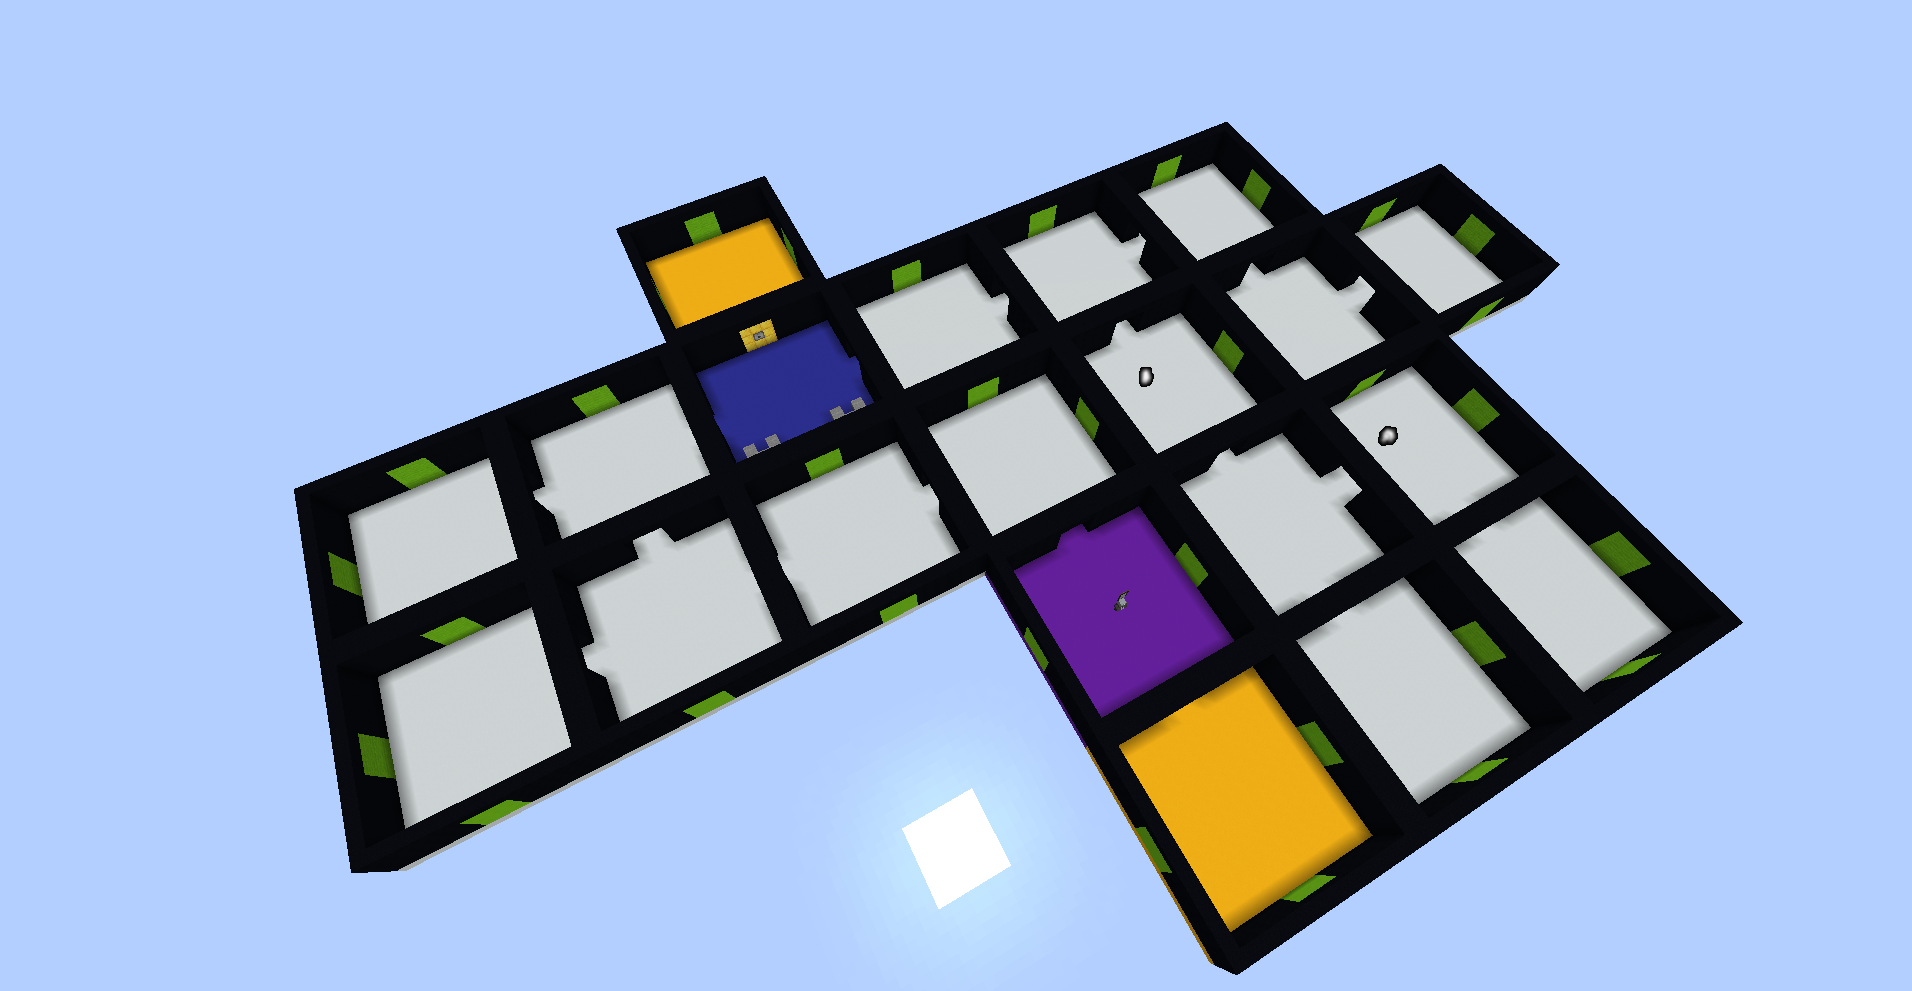
And this is where the Journey begins. Unleash your Creativity and make your own Dungeons and let your player conquer them.
Thank you for sticking till the end and Good luck!
(In order to access the full Wiki and learn all the Dungeons Editor in-depth you need to Login)
DISCLAIMED: DO NOT FORGET TO VALIDATE YOUR PACK FROM THE EDITOR GUI OTHERWISE YOU MIGHT HAVE TO REDO ALL THAT ONCE AGAIN